Showing posts with label frugal. Show all posts

Sunday, June 1, 2014

Fixing Up the Shack

Lately I've been working a lot outside in our yard in a desperate attempt to make our house look more like a home and less like a run down shack. A lot of things have been languishing because we just haven't had the money to have them repaired. We still don't, honestly.

Last year we removed our back deck because it was rotting, causing water damage to the house, and no longer safe. We also removed the back stairs coming from our entryway because of a pesky paper wasp infestation (NASTY buggers!). The deck has now been replaced with a small set of stairs, and the other steps were rebuilt, but there was damage left to the house from where the old structures once were. This is what the area around our back stairs looked like after the new steps were put in:


We have exactly $0 available for repairs right now, so I had to get creative and come up with a solution using what we already had on hand. We had some boards left from the old deck that were still in usable condition, so I cut them down and used them to cover the exposed areas of the house. Bonus: they were already painted to match the house.


It's not perfect, but it's much better than before. I had originally planned to put a large planter in that space next to the stairs, but I found that the kids' sandbox fits nicely instead.

As for where the old deck was? There is currently a barren patch of dirt there instead. I scattered some grass seed in the hopes of having it blend in with our existing lawn, but it remains to be seen if it will grow. Heck, as long as SOMETHING green grows there, I don't even care if it's grass. I'll just be glad it's not mud anymore.

The veggie garden has been improved, too. We rented a rototiller and hubby used it to vanquish all the weeds that had taken over. I have most of our veggies planted now. This year I'm growing zucchini, bell peppers, onions, and a boatload of green beans. I'm also trying out something new to me this year- growing potatoes in trash barrels. I'm excited to eat all the yummy veggies we grow this summer!

Monday, May 19, 2014

Hanging Out

Now that the weather is steadily above freezing I have been able to hang my laundry outside in the fresh air once again. I know it may sound silly, but I LOVE the smell of laundry that has been dried on the clothesline, especially sheets. Hanging our clothes also saves a bunch of money off our electric bill. Our clothesline is located in a small area between the rear of our house and our shed.

A few weeks ago I finally got around to changing out our old clothesline because it was very worn out. I added more lines too so I can easily hang 2 full loads of laundry at the same time. I do a LOT of laundry so this has been quite a timesaver.


When I took down the old clothesline, I decided to reuse it rather than throwing it away. I had a beautiful bright blue yarn just waiting in my stash for a cool project, so I crocheted a couple small baskets using the yarn and old clothesline. I'm quite happy with how these turned out! They'll probably come in handy for storing small toys.


Saturday, May 10, 2014

I've been working on a few projects around the house lately. I'll be sharing more of them later as I finish them, but I wanted to show you a quick and cheap update we did in our upstairs bathroom.

We recently got a new TV and stand, so our old entertainment stand was dismantled and stuffed in the basement. When we were taking the old one apart, I noticed that a couple pieces had a nice beveled edge on them that I really liked. I decided to repurpose those pieces and turn them in to shelves for the bathroom.

Here they are:


The only thing we had to buy for them was the brackets to mount them on the wall, which were $1 a piece. Everything else (shelves, paint, screws, etc.) we had on hand. Yay for cheap home improvements!

Wednesday, May 7, 2014

Homemade laundry detergent

We just recently ran out of my homemade laundry detergent, so I figured I'd share how I make it while cooking up a new batch. I have tried a few different recipes for detergent, and this one is definitely my favorite. It works just as well as commercial laundry soap, but costs WAY less. i can make enough detergent to last us a year for about $15. Our family of 7 does a lot of laundry so this is a huge money saver for us!

I found the original recipe HERE, but use a little less Borax and Washing Soda than called for.


Ingredients:
1 bar Zote laundry soap
2 1/2 cups Borax
2 1/2 cups Washing Soda (NOT baking soda)
water
5 gallon bucket

1) Grate the bar of Zote with a cheese grater


2) Put the grated soap in a large saucepan and add enough water to cover it. Heat the saucepan on medium until all the soap has melted, stirring occasionally


3) While the soap is melting, fill the 5 gallon bucket about halfway with hot water. Add the Borax and Washing Soda to the bucket and stir until it dissolves completely.

4) Once the soap has melted, add it to the bucket. Fill the bucket the rest of the way with hot water and stir.

5) Cover the bucket and let it sit overnight to cool. It will thicken as it cools and look like a giant blob of pink Jello. Stir it around until it looks like the pink slime from Ghostbusters 2. Shake or stir before using (it is normal for it to separate a little).

That's it! I use 1/4 cup per load in my HE washing machine. For regular washers, use 1/2 cup per load. It usually takes me about 20 minutes to cook up a batch of this detergent- that's less time than it takes for me to go to the store and buy laundry detergent!

Tuesday, January 14, 2014

A new life for leftovers

So I've been doing my best to keep making inexpensive dinners for the family, and have been mostly successful. Ok, we did cheat and eat at McDonald's last night, but kept it to the dollar menu at least. We can't all be perfect. One of the ways I try to keep food costs down is to make sure we don't waste a lot of food. That means eating leftovers rather than tossing them in the trash, as well as buying only what we will eat. The kids usually love it when we have leftovers for dinner. Sometimes it can get boring eating the same thing over and over though, so I try to get creative with what we have in the fridge. Just a couple days ago I made up some fried rice using nothing but leftovers. 
It's super easy- just toss some cooked white rice with whatever leftover meats and veggies you have in a pan with a little soy sauce. It's really yummy, and best of all really cheap! This meal was essentially free!!!

Thursday, January 2, 2014

Turn it off!

The kids are home from school today because of yet another snow storm that is blowing around outside. I am determined to continue my thrifty ways even with all the miniature money-suckers around though. I have spent a good portion of the day following them around and instructing them to TURN OFF THE LIGHTS, especially when I find them on in nearly every room of the house during the daytime when lights are not necessary. Sigh. 

I did catch myself using some unnecessary electricity as well. With so many people living here, our dishwasher gets used OFTEN. I usually have to run it twice a day, sometimes more such as holidays or weekends. One thing I was doing without even thinking about it was using the "heated dry" cycle to dry the dishes faster. Honestly, this is really not necessary and uses quite a bit of electricity. So I simply turned that off and leave the door cracked open to allow the dishes to air dry. I suppose if I was feeling like Martha Stewart I could towel dry the dishes, but I seriously don't have time for that. 

Dinner was nice and cheap today. We had tacos with yellow rice and corn- yummy! The ground beef for the tacos was purchased on sale a while ago and has been waiting patiently in the freezer for me to cook it up. The taco kit I used was less than $1 after coupons, and the corn was bought on sale as well. The rice was FREE thanks to coupons (my favorite price). Our dinner cost just under $5 total for the 7 of us. Not too shabby. 

Hubby also did something frugal today- he cleaned! He went through the giant pile-o-crap on our desk and found a couple gift cards that we had completely forgotten about. He decided to use them to buy himself a treat (some DVDs from Best Buy). I don't even know where the gift cards came from in the first place, but it's always fun to find things like that. I wonder what I'll find when I do the laundry...

Back in the saddle again

For the past couple months we have been practically hemorrhaging money. 'Tis the season, I know. We bought an obnoxious amount of gifts for the kids, ate out way too often, drove around more than usual, and celebrated the holidays in fine consumerist style. While I admit that it was a nice change to be frivolous, I am just plain burnt out from all the shopping. Normally I'm as thrifty as possible, and I plan to get back to being that way. 

I figured this was a good place to not only keep myself accountable, but also share some of the ways I stay thrifty. I do many things every day that are thrifty or frugal without even thinking about it- I wear clothing purchased at the thrift store, wash our laundry in homemade laundry detergent, cook from scratch, use cloth diapers on the baby... you get the idea. I want to share at least a few of the things I do here to help me get back to my frugal ways. 

Today I did something simple that seems to be a bit old fashioned to some- I darned socks. Some of my hand knit wool socks were getting worn thin, so rather than tossing them and buying new ones, I darned them so I can hopefully wear them for another season. I often darn the hubby's socks too (that man is a sock killer!), and occasionally the kids'. I know socks aren't that expensive, but when your available cash flow is nonexistent, replacing them just isn't an option. I forget where I learned to do this, but I know there are plenty of tutorials online. 

Today's dinner was also thrifty. I made baked Mac & Cheese with some pasta and cheese that I got for cheap with coupons. Even with the veggies we ate, dinner cost less than $5 total for the six of us. Eating at home is so much more frugal than fast food!

Tuesday, September 24, 2013

Upcycled Baby Hats

Fall is finally here, and the weather has been getting cooler. I love this time of year because it's cool enough to go outside without sweating buckets, but just cold enough to break out the sweaters.  The littlest minion, although he is very cute, is quite bald and his little head can get cold.

See- very bald!

I found a great pattern online for the Sweet Pea Pilot Cap that I thought was just adorable. Being both thrifty and crafty, I decided to make a few out of my older boys' outgrown t-shirts. We have just recently gone through all of their clothes and gotten rid of any outgrown or worn out clothing, so I have quite a bit to choose from. I have 5 trash bags of clothes in my basement now waiting for a trip to the thrift store! I took a few shirts that had holes or stains on them and made these:


He loves his hats, and seems so happy to have a warm head!

While I was cutting apart the shirts to make hats, I decided to use the sleeves from a long-sleeved shirt to make some pants. I didn't use a pattern for these, I just used a pair of pants we already had as a guide. Here was the result:


So far, I've made 5 hats in a couple different sizes and 2 pairs of pants. The best part? It cost me absolutely nothing to make all of them because I used stuff we already had. Yay for free baby clothes!


Sunday, September 15, 2013

Keeping Baby Frugal Part 2 - Our Biggest Money Savers

Those of you with kids already know that the biggest expenses with little babies is not the big-ticket items such as cribs or car seats. The largest amount of money is actually spent feeding and clothing those tiny bodies. The cost of diapers, formula, baby food, and clothes can easily add up to thousands of dollars for the first year alone! Here is where we end up saving the most by making smart choices and being a little creative.

Feeding Baby

Formula can easily cost over $100 a month for the first year. I'm too cheap for that! My solution? BOOBS!!! They're not (just) a man's plaything- they are milk bags. I have been fortunate enough to breastfeed all 4 of my children, and we have all benefited from it. They get nutritious breast milk, I get decreased breast cancer risk, and we all get to save money. Though honestly, I really enjoy breastfeeding simply because I get to cuddle with my little ones while they are still little :o) It makes it easier for me to be lazy too! There's no bottles to clean, nothing to sterilize, no formula to mix, and nothing to heat up in the middle of the night. All I have to do is lift my shirt and stuff my boob in baby's mouth- much easier. I was even able to get an electric breast pump through my health insurance company at no cost to me. I realize that breastfeeding may not work for every family, but it works great for us!

Every time I walk down the baby isle at the grocery store I am amazed at how expensive those tiny jars of baby food are. I mean, what are they made of to warrant such a high price tag? Unicorns??? (not that I would want to feed my child pureed unicorns, mind you) And have you ever tasted them? They don't even taste remotely similar to the food on the label. Some of them are just plain GROSS! I swear the pureed chicken baby food smells just like cat food. We save money here by making our own baby food. It's very simple - just puree some fruits or veggies with a blender and voila, you have baby food. You can even puree whatever the family is eating so you don't have to cook anything extra. It freezes easily in ice cube trays, so I like to make a large batch at once and freeze for later to save time. I really like knowing exactly what is in my baby's food, and it tastes so much better than the jarred stuff.

Diapers
Babies poop. A LOT! Newborns can go through a dozen or more diapers per day, and they can get crazy expensive. Disposable diapers can cost over a thousand dollars by the time your little one learns to use the potty, not including baby wipes. This is where we save a HUGE chunk of change by using cloth diapers. These aren't like the diapers your grandma used- these are just as easy as disposables now. Our favorite kind of cloth diapers are "pocket diapers" that have a waterproof outer to keep baby's clothes dry, a soft fleece inside that keeps baby's bum dry, and an absorbent insert that you stuff it with to catch everything that comes out of baby's hiney. We recently discovered a cloth diaper company in China named Alva Baby that makes really inexpensive diapers that are just as good as many other brands. We bought some of their one-size-fits-most diapers, and hope to keep using them until the minion is potty trained. I will admit that we did slpurge a bit on some custom embroidered diapers from ChunkabuTT Creations because we're dorks and found it necessary to plaster that fact on our child's bum.

We also use cloth wipes that I made from an old flannel bed sheet that was given to me. I was able to make 40 double-sided wipes that are 8" x 8" and fit nicely in a regular baby wipes box. I even found a video for folding the wipes so they pop up in a wipes container. Yay for more free handmade stuff!

Our total cost for all our diapers and wipes is less than $300 total. Much better that those pricey disposables!

Clothes

For the first few years of a child's life they grow amazingly fast. So fast that they will outgrow nearly all their clothes before they even become slightly worn out. Because of this I have a hard time dropping $20 on one pair of jammies that my baby will wear maybe 5 times before outgrowing them. For this minion, about 95% of his clothing came from 2 places- the thrift store and a children's resale shop. I usually spend no more than $5 for a complete outfit, and the clothing is all in fantastic shape because it was barely worn. The cheapest clothing is from the thrift shop. I buy whatever is on sale for half off and have a frequent shopper's discount card, so most things cost $1 or less. The children's resale shop is slightly more expensive, but all of their stuff is name-brands in excellent shape. Another good place to get clothing is yard sales, but we weren't able to go to many this past summer. As an added bonus, when the minion has outgrown his clothes yet again I can sell the good stuff to the resale shop and make back some of the money spent (though the money usually goes towards clothing in the next size). If you're not interested in buying clothing used, then check out the clearance rack at your favorite store. I can often score brand new clothing for less than $5!

Tip: when buying used clothing, always look at it carefully in the store to check for stains and holes. It's not worth buying something that is stained or falling apart, and many thrift shops and resale stores do not allow you to return items.


Sunday, September 8, 2013

Keeping Baby Frugal Part 1 - Baby's Room

Now that our new little one is here, I figured I'd share some of the ways we stay frugal when it comes to having a baby. Just like many of you out there, our family isn't made of money, so I try to save whenever and wherever I can. But let's face it- babies are EXPENSIVE!!! All those toys, tiny clothes, diapers, cribs, and stuff that goes along with having a little one can cost big $$$, and it all adds up fast if you're not careful.

A lot of families save on baby gear by passing it down to younger siblings when they come along. This is a wonderful way to save on big ticket items such as cribs, clothing, and furniture! Unfortunately for us, this couldn't happen with this baby. We have moved since Thing 3 was born and had gotten rid of most of the baby stuff to make room in our crowded house. Even if we had saved some things, safety standards had changed pretty drastically in that time, so many things would have to be replaced anyway (namely the crib and car seat). We basically had to start completely from scratch with this baby, just as we did with our first. This time though, I had learned a few tips and tricks that saved us loads of $$$

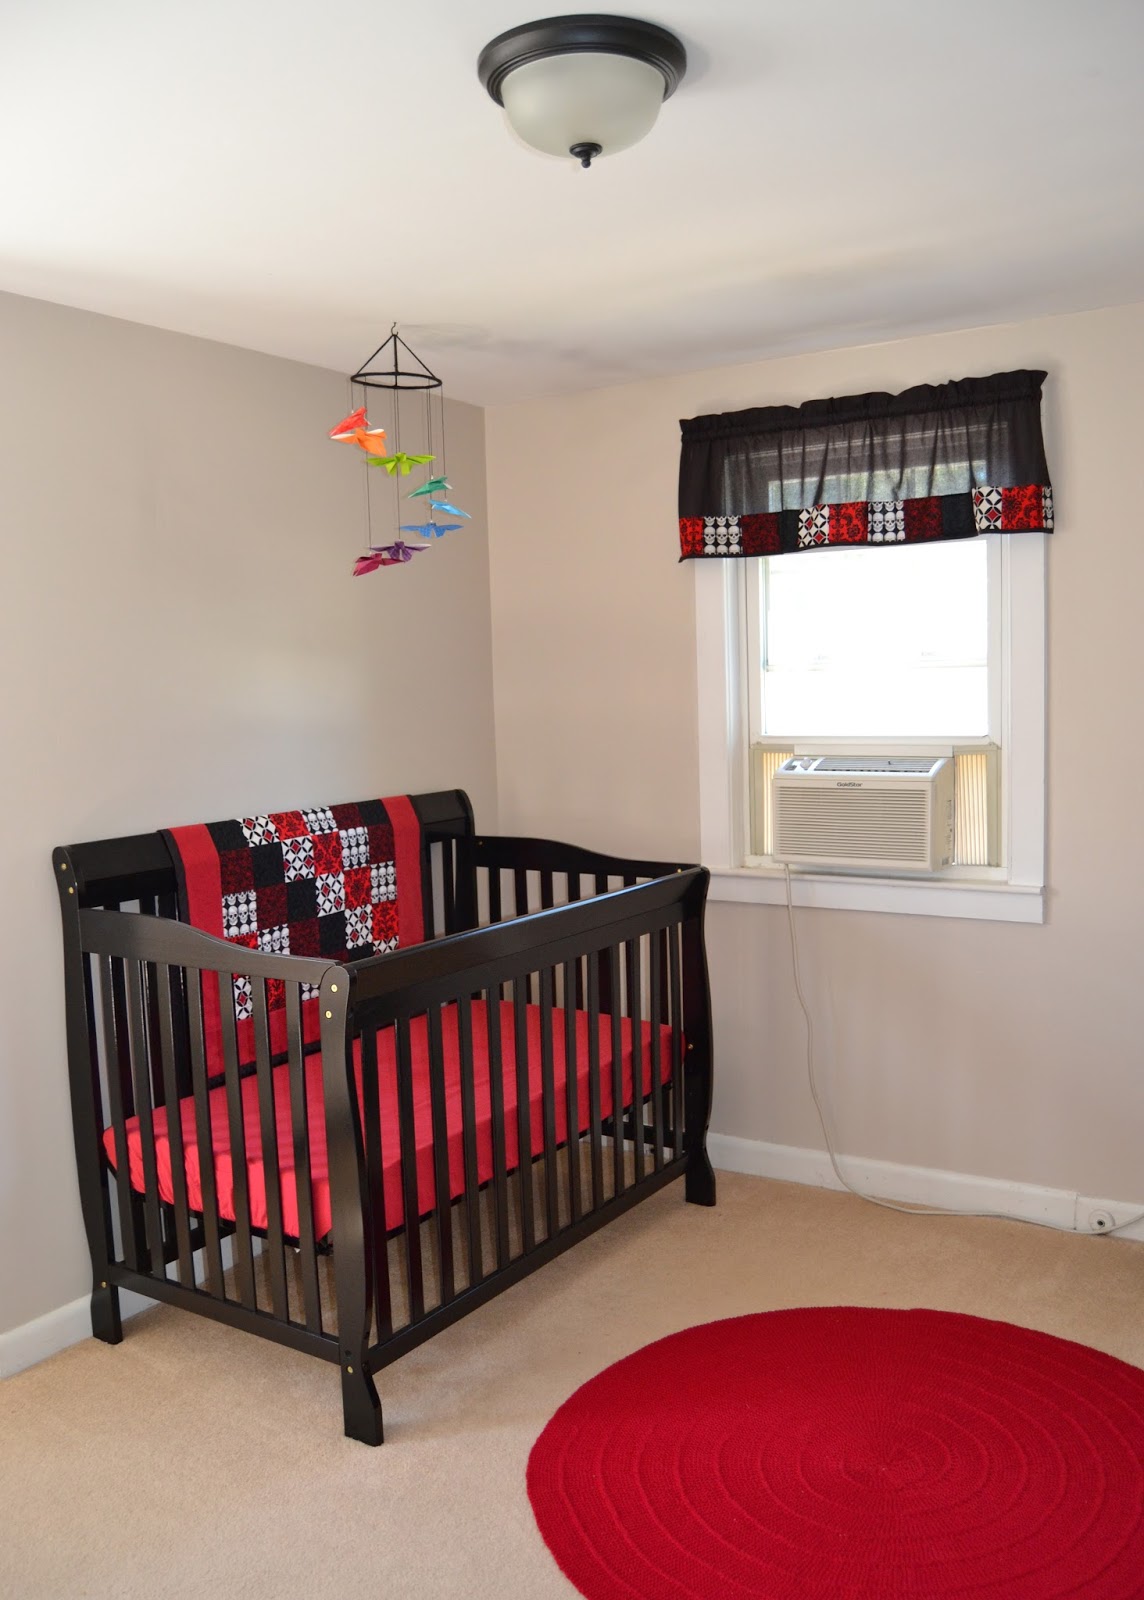
Let's start off with the baby's bedroom. Here is where you can easily spend thousands of dollars buying cribs, changing tables, furniture, decorations, and cute themed bedding. We managed to spend only a few hundred dollars for everything, and most of it was purchased brand new. Many items were handmade to not only save money, but also give us a custom look that we couldn't find in any baby shop. Here's a little breakdown of what we spent in the baby's bedroom:

Crib

This is a must-have item in my opinion. Baby needs somewhere safe to sleep! This is also where a huge chunk of cash can be spent. Cribs can range in price from a few hundred dollars to over a thousand dollars, depending on which one you get. That's right folks, they cost just as much as a full-sized bed for an adult. Add to that the cost of a crib mattress, and you're wallet is pretty empty. Safety standards for cribs have changed drastically in the past few years, so we weren't comfortable purchasing a used crib. We saved money here by shopping around for the best price and combining sales and coupons to make it even cheaper. The best price we found was on sale online at Babies R Us. We just happen to be on their mailing list and received a coupon for 20% off any item that we combined with hubby's employee discount. The original cost of the crib was $200, plus shipping of course which was another $20. Pretty inexpensive compared to most cribs out there. The mattress we chose cost $60, so we're in for a grand total of about $280 so far. What did we end up paying? After the coupon and discount we ended up paying just under $200 for everything, so it was like we got the mattress for free. This crib can also convert to a toddler bed and a full-sized headboard and footboard, so we can avoid paying for those down the road. Once we are done with the crib we plan on selling it and making back some of the money we spent.

Dresser

Dressers can cost even more than a crib, if you can believe it. We got lucky here and had a dresser in the basement that belonged to Thing 3. Huzzah for hand-me-downs! It was really banged up from some serious abuse from the boys, so it needed to be refinished and repaired. The total cost of paint and materials to refinish it was about $50. Originally, this dresser would have cost around $300-$400, so we saved a big chunk of change with this. Our dresser also doubles as a changing table, so we were able to skip buying that completely. The changing pad on top was purchased for $5 at a yard sale.

Rocking Chair

Here was our biggest splurge in the baby's room. For midnight feedings, a glider rocker is a necessary item to me. Not so much for the baby, but more for my comfort. I spend countless hours nursing my babies in the middle of the night, so having a comfortable place to sit is important. I wanted a glider that was solid wood with nice soft cushions and an ottoman so I could put my feet up and relax while nursing at 3am. This is an item that I was OK buying used, as long as it was in good condition. We weren't able to find anything locally unfortunately, so we ended up purchasing new. Again I shopped around for the best deal and ended up purchasing online from Amazon.com. The price for this was $230, thankfully with free shipping. That's right people, I spent more on the rocking chair than I did on the crib or dresser. Consider this though- some glider rockers can cost $1000 for just the rocker, no ottoman! I'm hoping to get lots of use from this chair, and I'm sure it will be useful for many years after baby is done nursing.

Bedding & Accessories

Many parents really go crazy purchasing themed bedding and accessories to make the baby's nursery ultra cutesy. There are so many options for crib blankets, curtains, crib bumpers, sheets, mobiles- you name it, and all in adorable themes with cute animals or pretty flowers on them. I'm not a cutesy kind of gal, so it was easy to skip all these in the store and just make my own. I found loads of tutorials online and ended up sewing the crib sheets, changing pad covers, curtains, and baby quilt myself in funky black and red fabrics. The crib sheets were made from some red flannel sheets that I scored for free (my favorite price) using a tutorial on the Prudent Baby website. The changing pad covers were made from the same sheets using this tutorial, with a few modifications. The curtains were made using fabric leftovers in my stash and extra squares from the quilt, so they were basically free. I knit the area rug using yarn from my stash that a friend had given me and this free pattern, so again it cost me nothing. We skipped the crib bumper, both to save money and because they can be a potential safety hazard. The only bedding I paid for was the materials used to make the quilt. I had some fabric in my stash already and the rest I purchased with coupons, so it only cost about $20. That's it- just $20 for a custom bedding set!


The rainbow butterfly mobile was also made super cheap. Thing 1 just happened to have origami paper in her room, so I used a few sheets of that along with a wire ring from a broken tomato cage and some scrap yarn to make an origami butterfly mobile for FREE. I found the instructions for the origami butterfly here.

For those of you keeping a tally, we spent about $500 total for all our nursery furniture and accessories. Could we have saved more? Possibly. Still, I'm quite happy with what we have, and it was a lot of fun making everything :o)


Tuesday, September 27, 2011

Glittery Fun

Play dough has got to be one of the most fun things ever. Seriously. My 3 stooges all have a blast playing with it, just as I did when I was a kid. Lately though, our stash of play dough had been drying out, so it was time to make more. I got this awesome recipe from a teacher when thing 1 and thing 2 were in preschool, and have been using it over and over during the past several years. This time though, I decided that instead of making just plain old play dough, we would add glitter to make it even more cool. The boys helped me make it and declared it "The Best Play Dough Ever"!


And for those interested in creating your own sparkly fun, here is the recipe:

Homemade Play Dough

Small Batch:
2 Cups Water
1 Tablespoon Vegetable Oil
1 Tablespoon Cream of Tartar
1 Cup Salt
2 Cups All-Purpose Flour

Large Batch:
4 Cups Water
2 Tablespoon Vegetable Oil
2 Tablespoon Cream of Tartar
2 Cup Salt
4 Cups All-Purpose Flour

Mix all ingredients together thoroughly in a large saucepan. If you want to add food coloring or glitter, now's the time. Cook on the stovetop on medium-low heat, stirring constantly until it forms a dough ball and is no longer "gooey". Remove from heat and allow dough to cool. Knead dough once it's cool enough to touch to ensure a smooth consistency. Once cooled completely, store in an airtight container- do not store while still warm or it will turn gooey in the container.

This play dough lasts far longer than any store bought dough we've had, as long as it's stored in an airtight container (ours is by OXO, but a ziploc bag works just fine too). Also please note, this recipe makes a lot of play dough. The container shown has a small batch in it. If you omit the glitter, then this is actually edible, so it's perfect for little ones that still put everything in their mouth. I hope you enjoy this play dough as much as we do!

Friday, August 19, 2011

Reusable Snack Baggies


Ever get sick of buying sandwich baggies just so your kids can throw them away at lunch time? I know I HATE buying things just to throw them away after a single use (with the exception of toilet paper, of course). It's such a waste of resources and money! So rather than just complain about it, I decided to make these cute reusable baggies out of repurposed materials. The fabric I used is PUL- polyurethane laminated- fabric that I found at a charity yard sale. It was actually a mattress cover, and I purchased it for the rich sum of $2. It has loads of fabric to it, so I can make as many of these little baggies as I want, though I think 10-12 of each size will do. The large baggie (shown stuffed with green beans from our garden- YUM!) measures about 6" x 6", and the smaller one measures 3 1/2" x 6". I used velcro as a closure so it will be easy for my little minions to open and reclose themselves. The best part about these is that they are super easy to clean! I can just wipe the inside with a damp cloth, or if they get super yucky I can toss them in the dishwasher or washing machine. There is a similar tutorial for how to make these HERE if you're interested in making your own. The kids are excited to use these at school, and they will be great at picnics and the beach too :o)